使用Clash内核
一、下载Clash
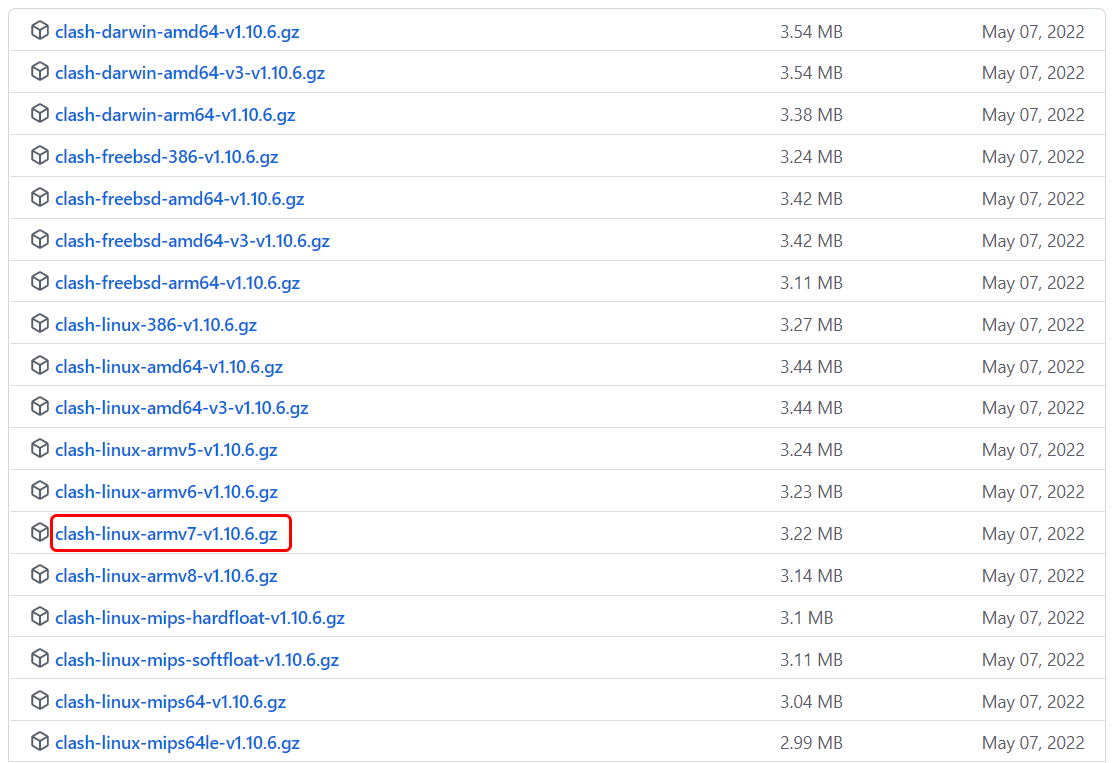
在这里我们使用Clash作为科学上网的代理框架,你可以到GitHub下载Clash内核。如果你是树莓派4B 32位操作系统,那么你应该下载对应armv7版本clash-linux-armv7-v1.10.6.gz,如果是树莓派4B 64位操作系统,那么你应该下载对应armv8版本clash-linux-armv8-v1.10.6.gz。
其他型号的树莓派可以通过以下命令查看树莓派的架构:
arch

下载完成后解压文件,建议把文件名改为clash, 然后移动到/usr/local/bin/clash位置,同时给该文件以执行的权限:
wget https://github.com/Dreamacro/clash/releases/download/v1.10.6/clash-linux-armv7-v1.10.6.gz
gunzip clash-linux-armv7-v1.10.6.gz
rm -rf clash-linux-armv7-v1.10.6.gz
mv clash-linux-armv7 clash
sudo mv clash /usr/local/bin
sudo chmod a+x /usr/local/bin/clash
二、配置Clash
Clash配置文件的默认路径是~/.config/clash,如果你的Home目录不存在相应文件夹就需要你自己创建,然后把你机场提供的配置文件放到该文件下就可以了,Clash配置文件的默认名称应该是config.yaml。
mkdir ~/.config/clash
mv your/clash/config/file config.yaml
mv config.yaml ~/.config/clash
另外Clash还需要一个Country.mmdb文件,Country.mmdb是全球IP库,可以实现各个国家的IP信息解析和地理定位,没有这个文件clash无法正常启动,你可以前往GitHub下载。下载完成后同样放在默认路径下就可以了~/.config/clash。
三、配置终端代理
首先我们需要添加几个环境变量:
sudo vim /etc/environment
然后添加以下配置内容:
export http_proxy="http://127.0.0.1:7890"
export https_proxy="http://127.0.0.1:7890"
export no_proxy="localhost, 127.0.0.1, *edu.cn"
系统变量的https_proxy的代理地址和http_proxy的代理地址是一样的,因为Clash使用一个地址同时代理http和https。另外,no_proxy表示其中的地址不需要代理,这一点很重要,比如我们不需要代理我们的校园网地址,因此加入要*edu.cn。
然后再对相应的终端应用配置代理:
为sudo配置代理
进入sudo配置文件:
sudo visudo
然后添加以下内容:
Defaults env_keep+="http_proxy https_proxy no_proxy"
为apt配置代理
进入apt配置文件:
sudo vim /etc/apt/apt.conf.d/10proxy
然后添加以下内容:
Acquire::http::Proxy "http://127.0.0.1:7890/";
为git配置代理
进入git配置文件:
vim ~/.gitconfig
然后添加以下内容:
[http]
  proxy=http://127.0.0.1:7890
[https]
  proxy=http://127.0.0.1:7890
为pip配置代理
进入pip配置文件:
vim ~/.config/pip/pip.conf
然后添加以下内容:
[global]
  proxy = http://127.0.0.1:7890
  http-proxy = http://127.0.0.1:7890
  https-proxy = http://127.0.0.1:7890
  trusted-host = pypi.python.org global.trusted-host pypi.org global.trusted-host files.pythonhosted.org
为npm配置代理
进入npm配置文件:
vim ~/.npmrc
然后添加以下内容:
proxy=http://127.0.0.1:7890
http-proxy=http://127.0.0.1:7890
https-proxy=http://127.0.0.1:7890
为cargo配置代理
进入cargo配置文件:
vim ~/.cargo/config
然后添加以下内容:
[http]
  proxy=http://127.0.0.1:7890
[https]
  proxy=http://127.0.0.1:7890
四、使用Clash
配置完成后需要重启树莓派让配置生效,这样配置才能生效。理论上这样一波配置后,大部分终端应用都可以正常使用了,如果你有其他的终端应用可自行参考相关文档进行配置。
重启之后在终端中输入clash,如果输出类似以下内容那么就说明Clash启动成功了。
INFO[0000] Start initial compatible provider 手动选择
INFO[0000] Start initial compatible provider 节点选择
INFO[0000] Start initial compatible provider 故障切换
INFO[0000] Start initial compatible provider 自动选择
INFO[0000] HTTP proxy listening at: [::]:7890
INFO[0000] RESTful API listening at: 127.0.0.1:9090
INFO[0000] SOCKS proxy listening at: [::]:7891
你可以更新一下系统或者打开浏览器测试一下Google,如果可以访问你就可以愉快地玩耍了!
五、开机自启
既然我们都已经可以使用Clash了,当然要让树莓派能够开机自启Clash对吧。在树莓派推荐使用crontab作为自动任务管理器。
输入以下命令可以打开crontab:
crontab -e
第一次使用可能需要你选择默认的编辑器,看个人喜好选择就好,然后在打开的文件末尾添加以下内容:
@reboot /usr/local/bin/clash
六、控制面板
GitHub上有很多优秀的有关Clash Dashboard的项目,这些项目可以非常方便地帮助你查看、设置和管理你的Clash。
从GitHub上克隆Clash Dashbaord到Clash的默认配置文件夹下。
cd ~/.config/clash
git clone https://github.com/Dreamacro/clash-dashboard.git
cd ~/.config/clash/clash-dashboard
git checkout -b gh-pages origin/gh-pages
下载完成后你需要对Clash的配置文件稍作修改,在config.yaml的头部添加或者修改以下两项:
external-ui: clash-dashboard
external-controller: 127.0.0.1:9090
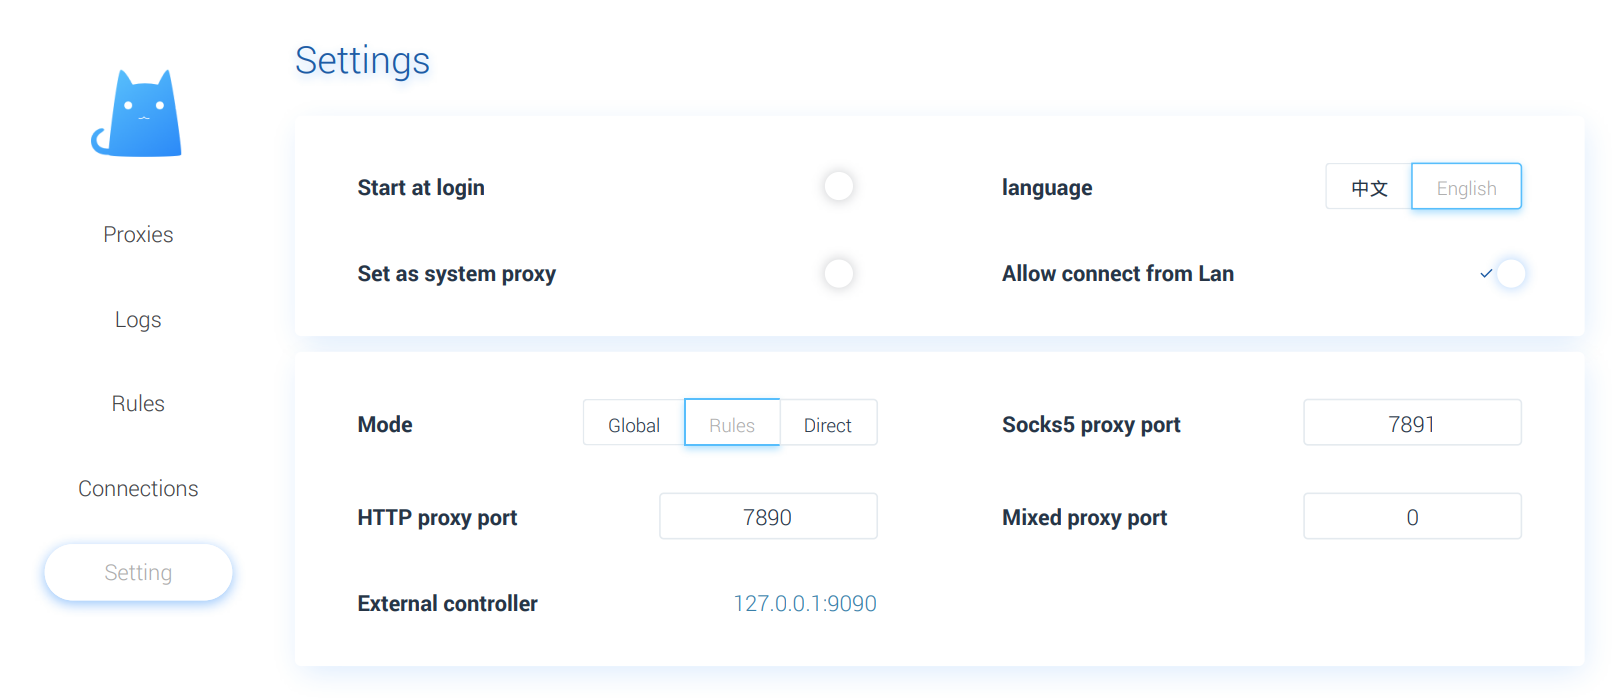
然后在浏览器中输入http://127.0.0.1:9090/ui就可以看到Clash的控制面板了。
